
ansible 서버가 노드들에게 docker 을 설치하라는 playbook을 만들어서 전달하게 된다. 그런데 node 들 별로 배포판 정보가 다른것이다.
그러면 모든 node에서 설치가 안될 수 있다. 왜냐하면 명령어가 다르기 때문이다.
그래도 다양한 서비스를 받아들이기 위해서는 각 조건에 맞는 환경을 구축해주어야 한다.
그리고 각 환경에 따른 파일을 나누어 주어야 한다.
1. 재사용성
2. 개발용의(협업)
두가지 장점이 있기 때문이다.

개발시 파일을 나누게 되면 main.yaml을 기반으로 나누어서 개발이 가능해지기 때문에 협업이 가능하게 된다.
또 파일별로 CI/CD 가 가능해진다는 장점도 존재한다.
---
vagrant init 을 하면 로컬 저장소/Vagrantfile가 생성된다 (.vagrant 를 이용하여 버전관리 할 수 있는 준비가 된 상태)
Vagrantfile을 작성 또는 수정 -> vagrant up (서버 또는 가상 디바이스 들의 환경배포) -> 가상머신 들에게 추가적으로 필요한 작업 진행(패키지 설치, 파일/디렉토리 생성/복사, 파일에 특정 내용 삽입, 서비스의 실행, 주로 쉘의 실행)을 하고 싶다면 provision을 진행한다.
-> vagrant provision을 실행(provision이 부착된 라인만 추가 실행 됨) 이전에 프로비전을 실행했고 추가적으로 필요하지 않다면 주석처리를 권장


hosts: localhost 는 작업대상을 의미한다. 작업대상은 인벤토리 파일에 의존한다. 즉 인벤토리 파일에 의해서 작업대상을 지정할 수 있다. localhost는 자기자신만을 의미하게된다.(기본 인벤토리 파일 /etc/ansible/hosts)(혹은 lst를 만들어서 ansible-playbook -i a.lst 로 리스트를 지정해줄 수도 있다.)

```
vagrant ssh ansible-server
ansible all -m setup > info.txt
```
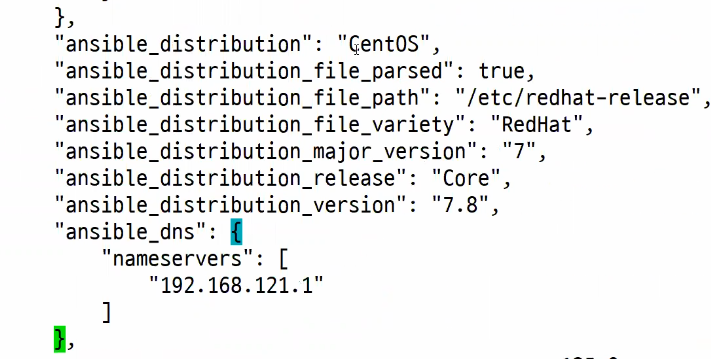
가저온 정보를 보면 CentOS, 버전, DNS 정보등을 볼 수 있다.

연결된 ip 정보도 볼 수 있다.


어떤 OS인지도 확인이 가능하다.
이걸 이용해서 OS 별로 다른 ansible-playbook 파일을 만들 수 있다.
---
- name: test configuration
  hosts: localhost
  gather_facts: no

  tasks:
    - name: install git
      yum:
        name: git
        state: present

    - name: install httpd
      yum:
        name: httpd
        state: present

    - name: start httpd
      service:
        name: httpd
        state: started

    - name: stop firewalld
      service:
        name: firewalld
        state: stopped
    - name: creating index.html
      get_url: url=https://www.naver.com dest=/var/www/html/index.html
이제 test.yaml 파일을 이용해서 페이지까지 띄워보자
이때 gather_facts: no로 하는 이유는 두가지
1. python이 설치되지 않은 환경이거나
2. 구지 정보를 수집해서 시간이 걸리도록 하지 않기 위한 경우
get_url은 curl을 이용하여 index.html 파일을 생성하는 모듈.
이렇게하면 `https://www.naver.com`의 내용이 index.html로 옮겨가게 된다.
---
추가적인 ansible module 들을 확인해보자
All modules — Ansible Documentation
All modules — Ansible Documentation
docs.ansible.com


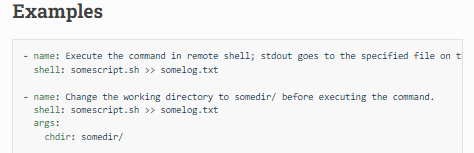
shell은 원격지에서 명령을 실행하라는 모듈이다.
args를 사용해 chdir를 사용하면 soomedir directory를 변경한다음 soomedir에 있는 somescript.sh을 사용하라는 의미가 된다.
쉘 모듈: 멱등성을 보장하지 않는다. 기존 내용을 덮어쓰기 할 수 있다.
- name:
shell: 실행할 명령
replace 모듈 : 파일 내용 변경하기 (sed를 대체)
- name: test
replace:
path: /etc/test/test.txt
regexp: 'hello'
replace: 'hi'
-> 노드에 전달할 때에는 sed -i 's/hello/hi/' /etc/test/test.txt
변수 활용하기
- hosts: loc

  tasks:

  - name: ANsible shell module multiple commands

    shell: "cat {{ item }} | grep ansible"

    with_items:

      - hello.txt

      - hello2.txt

      - hello3.txt

    args:

      chdir: /root/ansible
위와 같이 with_items 내에 있는 것들을 shell을 통해 하나씩 실행해보겠다는 의미가 된다.
보통 변수명으로 item이라고 쓰게 된다.
-> 작업시 먼저 /root/ansible 디렉토리로 이동하여
cat hello.txt | grep ansible 이 끝나면 cat hello2.txt로 작업이 진행된다.
서비스 모듈 : service
- name: test
service:
name: sshed
state: restarted/started
enabled: yes == systemctl enable sshd
file 모듈 (파일/디렉토리 만들기, 속성변경, hard/soft link 생성도 가능)
- name: test
file:
path: /home/vagrant/test
state: touch(파일생성)/directory/absent(삭제)/file(이미 있는 파일 속성 변경)/hard(하드 링크)/link(소프트 링크)
mode: 0777
lineinfile : 특정 파일내 필요한 내용을 덧붙이기한다.
- name: test
lineinfile:
path: /etc/test.txt
line: "hello all"
만약 덧붙일 내용이 여러줄이라면?
- name: test
lineinfile:
path: /etc/test.txt
line: "{{ item }}"
with_items:
- "hello gildong"
- "hello sunhee"
- "hello minsoo"
*그래서 line은 for과 비슷하다.
blockinfile
여러줄을 덧붙이는 방법으로 blockinfile도 있다. 둘 사이의 차이점은 blockinfile은 전체를 통으로 옮겨서 작성한다.
- name: test
blockinfile:
path: /etc/test.txt
block: |
[friends]
gildong
chulsoo
얘는 한번에 정보가 가버린다.
여러줄을 작성할 때에는 지정된 변수인 item을 사용해야한다. 하지만 별도로 지정한 변수를 사용하고자 한다면 다음과 같은 방법을 이용할 수 있다.
- name: test
hosts: all
gather_facts: yes
vars:
test_shell:
- "hostname &&"
- date
tasks:
- name:
shell: "{{ test_shell }}"
이렇게하면 hostname과 date가 함께 실행된다.
SELINUX 사용하기, 기본적으로 실행중이다.
- name: disable selinux
selinux:
state: disabled # 비 활성화 된다.
---

리소스를 바꾸고 싶은경우가 있을 수 있다. 일단 위의 방법은 잘 안된다.
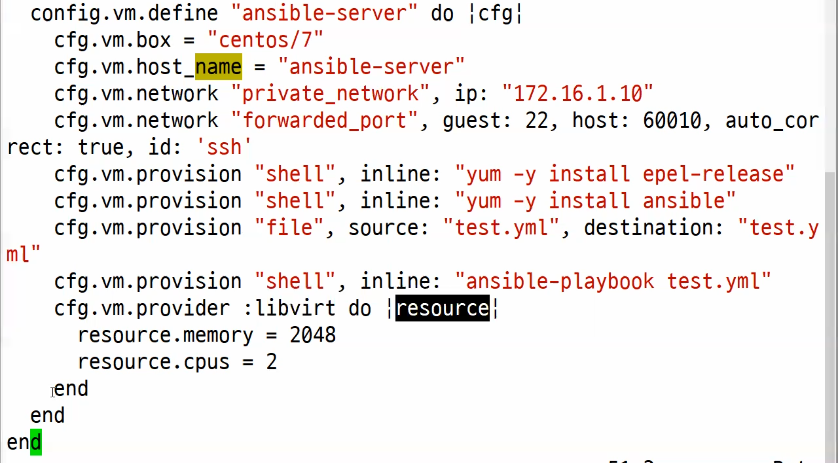
그래서 권하는게 위와같이 작성해주는 방법이다.
resource는 임의로 적는거니 원하는걸로 작성해주어도 된다.
---
클라이언트의 ssh 연결/설정 파일은 /etc/ssh/sshd_config 파일을 확인해보면 된다.
ansible-server 에서 노드의 퍼블릭키를 수집하기 위하여 ssh-keyscan도 이미 실행한 상태이다.
---
플레이북
한개의 playbook으로 nginx 배포하기


---
- name: httpd installation
  hosts: all
  gather_facts: no

  tasks:
    - name: SELINUX disabled
      become: yes
      replace:
        path: /etc/selinux/config
        regexp: 'SELINUX=enforcing'
        replace: 'SELINUX=disabled'

    - name: DIRECTORY CREATION
      file:
        path: /home/vagrant/testdir
        state: directory

    - name: libselinux-python install
      become: yes
      yum:
        name: libselinux-python
        state: present

    - name: httpd install
      become: yes
      yum:
        name: httpd
        state: present

    - name: index.html creation
      become: yes
      get_url: url=https://www.nginx.com dest=/var/www/html/index.html

    - name: start httpd
      become: yes
      service:
        name: httpd
        state: started
        enabled: true

    - name: stop firewalld
      become: yes
      service:
        name: firewalld
        state: stopped
        enabled: false
httpdinstall.yaml 을 이용해서 nginx 홈페이지를 배포해보자
```
ansible-playbook httpdinstall.yaml -k
```

---
nfs를 설치해보자
- name : NFS CLIENT
hosts: centos
gather_facts: no
tasks:
클라이언트는 로컬에 (/home/vagrant 아래에) remote 라는 디렉토리를 생성하고 nfs 서버의 172.16.1.10:/home/vagrant/shared를 remote와 마운트 시킨다.
---
- name: NFS SERVER
  hosts: localhost
  gather_facts: no

  tasks:
    - name: DIR creation
      file:
        path: /home/vagrant/shared
        state: directory
        mode: 0777

    - name: installation nfs server
      become: yes
      yum:
        name: nfs-utils
        state: present

    - name: configuring /etc/exports
      become: yes
      lineinfile:
        path: /etc/exports
        line: /home/vagrant/shared 172.16.1.0/24(rw,sync)

    - name: start nfs server
      become: yes
      service:
        name: nfs-server
        state: restarted

    - name: stop firewalld
      become: yes
      service:
        name: firewalld
        state: stopped
        enabled: false

- name: setup nfs client
  hosts: all  # /etc/ansible/hosts (주체 : 노드)
  gather_facts: yes
# 정보수집을 먼저 거치기

  tasks:
    - name: make nfs_client directory
      file:
        path: "{{ ansible_user_dir }}/remote"
        state: directory
        # 받아온 정보를 보면 ansible_user_dir = /home/vagrant 이다
        # 여기가 home dir이라서 위와같이 작성해주었다.

    - name: mount
      become: yes
      mount:
        path: "{{ ansible_user_dir}}remote"
        src: 172.16.1.10:/home/vagrant/shared   # server [nfs-server]
        fstype: nfs
        opts: nfsvers=3  # nfs 버전, 일반적으로 4
        state: mounted
vi nfsconfiguration.yaml
파일을 열어서 위와같이 작성해주면된다.

위와같이 nfs 가 공유된것을 확인할 수 있다.
추가적으로 우분투를 추가해보자
이를 위해 노드에서 나와서 master에서 Vagrantfile을 만져야한다.

이렇게 작성해주었다. 바뀐 부분이 많기 때문에 그냥 다 지우고 코드를 복붙해주자
# -*- mode: ruby -*-
# # vi: set ft=ruby :

###### ANSIBLE NODE 1~3 ######
Vagrant.configure("2") do |config|
  config.vm.define "ansible-ubuntu1" do |cfg|
    cfg.vm.box = "generic/ubuntu1804"
    cfg.vm.host_name = "ansible-ubuntu1"
    cfg.vm.network "private_network", ip: "172.16.1.14"
    cfg.vm.network "forwarded_port", guest: 22, host: 60014, auto_correct: true, id: "ssh"
    cfg.vm.provider :libvirtd do |cpuram|
      cpuram.memory = 1024
      cpuram.cpus = 1
      end
    end

  config.vm.define "ansible-node1" do |cfg|
    cfg.vm.box = "centos/7"
    cfg.vm.host_name = "ansible-node1"
    cfg.vm.network "private_network", ip: "172.16.1.11"
    cfg.vm.network "forwarded_port", guest: 22, host: 60011, auto_correct: true, id: "ssh"
    # cfg.vm.provision "file", source: "auth.sh", destination: "auth.sh"
    # cfg.vm.provision "shell", inline: "/bin/bash auth.sh",privileged: true
    end

  config.vm.define "ansible-node2" do |cfg|
    cfg.vm.box = "centos/7"
    cfg.vm.host_name = "ansible-node2"
    cfg.vm.network "private_network", ip: "172.16.1.12"
    cfg.vm.network "forwarded_port", guest: 22, host: 60012, auto_correct: true, id: "ssh"
    # cfg.vm.provision "file", source: "auth.sh", destination: "auth.sh"
    # cfg.vm.provision "shell", inline: "/bin/bash auth.sh",privileged: true
    end

  config.vm.define "ansible-node3" do |cfg|
    cfg.vm.box = "centos/7"
    cfg.vm.host_name = "ansible-node3"
    cfg.vm.network "private_network", ip: "172.16.1.13"
    cfg.vm.network "forwarded_port", guest: 22, host: 60013, auto_correct: true, id: "ssh"
    # cfg.vm.provision "file", source: "auth.sh", destination: "auth.sh"
    # cfg.vm.provision "shell", inline: "/bin/bash auth.sh",privileged: true
    end
end

###### ANSIBLE SERVER CONFIG #######
Vagrant.configure("2") do |config|
  config.vm.define "ansible-server" do |cfg|
    cfg.vm.box = "centos/7"
    cfg.vm.host_name = "ansible-server"
    cfg.vm.network "private_network", ip: "172.16.1.10"
    cfg.vm.network "forwarded_port", guest: 22, host: 60010, auto_correct: true, id: 'ssh'
    #cfg.vm.provision "shell", inline: "yum -y install epel-release"
    #cfg.vm.provision "shell", inline: "yum -y install ansible"
    #cfg.vm.provision "file", source: "test.yml", destination: "test.yml"
    #cfg.vm.provision "shell", inline: "ansible-playbook test.yml"
    cfg.vm.provider :libvirt do |resource|
      resource.memory = 2048
      resource.cpus = 2
    end
  end
end
```
vagrant up
```

완성되었다.

wok에서도 확인가능하다.

ubuntu라는 것도 추가해주자
물론 ansible을 등록할때 이런 방식으로 OS를 기준으로 나누면 안되지만... 뭐 암튼 프로젝트를 해야하니까

잘 갔다오는 것을 확인할 수 있다.
---
- name: print distribution, pkg mgr
  hosts: all
  gather_facts: yes

  tasks:
    - name: debugging
      debug:
        msg:
          - "호스트네임 : {{ ansible_hostname }}"
          - "배포판: {{ ansible_distribution }}"
          - "패키지 매니저 : {{ ansible_pkg_mgr }}"
          - "사설 인터페이스 주소 : {{ ansible_eth1.ipv4.address }}"
getinfo.yaml을 작성해주자

그러면 위와같이 정보가 온 것을 볼 수 있다.
그래서 이 정보를 끌고와서 사용하는 것도 가능하다.
그럼 이 정보를 가지고 와서 CentOS와 Ubuntu를 다르게 배포하는게 가능할 것이다.
---
nginx 배포 실습
CentOS -> epel-release, nginx (using yum)
Ubuntu -> nginx (using apt)
하나의 yaml 파일에서 yum 모듈을 이용해서 nginx를 설치하고자 한다면 ubuntu는 사용하지 않는 모듈이므로 fail 이 될 것이다. 결국 최종 원하는 결과를 절~대 확인할 수 없다.
1. Ubuntu용과 CentOS 용을 별도로 구분하여 배포한다.
-> 우리실습에서는 인벤토리 섹션에서 centos, ubuntu를 구분해 두었으므로 이를 활용하여 yaml을 두개 만들고 각각의 배포판 버전에 맞는 nginx 설치 구성내용을 입력하면 된다.
2. 위의 경우대로라면 무조건 모든 리눅스의 배포판을 구분해야 하는데, 일반적으로 인벤토리에 배포판별로 구분하는 것은 의미가 없다.
결국 우리는 하나의 nginx 설치 파일 내에서 all로 지정된 호스트들의 배포판을 구분하여 각 배포판에 맞는 nginx 설치 방법을 제공해야 한다.
이를 위해 "when 조건"을 사용한다.
- name: 이름
action: 조건에 부합할 경우 해야할 작업
when: 조건 ansible_distribution == 'CentOS'
한번 짜보자
---
- name: nginx install
  hosts: all
  become: yes

  tasks:
    - name: centos > epel-release install
      action: "{{ ansible_pkg_mgr }} name=epel-release state=present"
      when: ansible_distribution == 'CentOS'
    - name: centos > nginx
      action: "yum name=nginx state=present"
      when: ansible_distribution == 'CentOS'
    - name: ubuntu > nginx
      action: "{{ ansible_pkg_mgr }} name=nginx state=present"
      when: ansible_distribution == 'Ubuntu'
newnginx.yaml 파일이다. 일부러 다양한 방식으로 코드를 짜보았다.

Quiz. ansible 서버에서 index.html 파일을 간단히 만들고 이를 각 서버의 nginx 기본 데릭토리로 복사한 다음 nginx를 실행해보세요!
확인은 ansible-server 에서 curl로 확인하시면 됩니다.
---
- name: nginx install
  hosts: all
  become: yes

  tasks:
    - name: centos > epel-release install
      action: "{{ ansible_pkg_mgr }} name=epel-release state=present"
      when: ansible_distribution == 'CentOS'
    - name: centos > nginx
      action: "yum name=nginx state=present"
      when: ansible_distribution == 'CentOS'
    - name: ubuntu > nginx
      action: "{{ ansible_pkg_mgr }} name=nginx state=present"
      when: ansible_distribution == 'Ubuntu'
    - name: cp index.html
      get_url: url=https://www.nginx.com dest=/usr/share/nginx/html/index.html
    - name: copy
      copy:
        src: index.html
        dest: /usr/share/nginx/html
      when: ansible_distribution == 'CentOS'
    - name: copy
      copy:
        src: index.html
        dest: /var/www/html
      when: ansible_distribution == 'Ubuntu'
    - name: start nginx
      services:
        name: nginx
        state: started
newnginx.yaml 파일이다.
get_url과 cp 방식 두개다 준비했다. copy를 하기 위해서는
curl https://www.nginx.com > index.html
이제 nginx 관련 정보를 모두 지워주자
---
- name: nginx install
  hosts: all
  become: yes

  tasks:
    - name: centos > epel-release delete
      action: "{{ ansible_pkg_mgr }} name=epel-release state=absent"
      when: ansible_distribution == 'CentOS'

    - name: centos > nginx delete
      action: "{{ ansible_pkg_mgr }} name=nginx state=absent"
      when: ansible_distribution == 'CentOS'

    - name: ubuntu > nginx delete
      action: "{{ ansible_pkg_mgr }} name=nginx state=absent autoremove=yes"
      when: ansible_distribution == 'Ubuntu'
deletenginx.yaml
'Development(Web, Server, Cloud) > 22) LINUX - Cloud' 카테고리의 다른 글
| 클라우드 73일차 (0) | 2022.05.10 |
|---|---|
| 클라우드 72일차 (0) | 2022.05.09 |
| 클라우드 70일차(kvm,vagrant, ansible) (1) | 2022.05.03 |
| 클라우드 69일차(aws-정리중, ansible, ????) (0) | 2022.05.02 |
| 클라우드 68일차 (0) | 2022.04.29 |


